-
The base ignition timing is set by altering the
position of the magnetic pickup relative to the reflector
wheel, by rotating the cam angle sensor (CAS). Please be
familiar with the CAS write-up
before proceeding.
-
- Please
be careful !
- If
you damage your Elan or endanger your life as a result of
something you read here, it is your responsibility.
Please use common sense.
-
- Tools needed for adjusting
timing:
- Timing light
- Paper clip
- Allen wrench
- An assistant!
Have the engine in
these conditions before staring procedure:
- Engine coolant at normal operating temperature
- All electrical accessories turned off
- Steering wheel in the neutral position
- Transmission in neutral
!!
The adjustment
procedure is as follows:
- Open the rear convertible top stowage area. Pull
back the right side of the carpet to reveal the
battery compartment cover. Remove this cover so
access to the battery's terminals are available.
- Open the hood/bonnet so you can get access to the spark wires.
You must remove the 6 hex-head end
cap screws to get to the wires.
- Jack up the right front wheel and remove
it--remember Jack Safety! Set
the wheel aside carefully and put a jackstand
under the jackpoint.
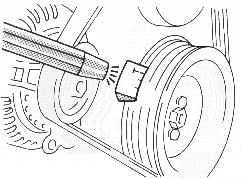
- Locate the "timing degree marks" on a small
metal square next to the timing belt pulley--be
sure it is clean and visible! (the picture to the right is a
general one and not from the Elan) Inspect the
condition of the other drive belts. If they are
cracked, they should be replaced! Find the little
"v"-shaped nick in the timing pulley--> when setting the
timing, you will see this nick across from the degree marks with
the flashing strobe--> the number across from the nick as the strobe
flashes is your current timing.
(Hint: to see these marks better,
and make them more visible while spinning, you can gently put a
bit of white chalk on them; but do not put too big a mark as to
obscure the fine nature of them!)
- Start car. Be careful as it is on a jackstand!!
- Put the car's ECU into "Service Mode"--this
mode locks out all engine sensors from inputting
to the ECU. This is done by inserting a paper
clip into the ALDL. Put in the clip while the car
is running at idle with all electrical
accessories "off." The clip should be
oriented the same way as you
would to check your "check engine"
light. (You must see ALDL diagnosis
for details if you are not familiar with this!!)
The "Check Engine" light will flash continually
throughout the procedure to
confirm the car is in "Service Mode."
- Connect the timing light as usual. One clamp goes
to the battery's "positive" lead, one goes to the
battery's "negative" lead, and the other goes to the
"number one" spark plug wire.
The "number one" wire is the
one traveling to the cylinder on the right side
end of the engine--this is the one closest to the timing
belt end and farthest from the CAS. You will need to remove the cam cover plate
by removing the 6 hex cap screws to attach the timing lead. (get
the Allen wrench out of the car's tool kit in the trunk if you do
not have another one!)
- Important: now you must slowly raise the engine speed over 2,000 rpm,
then return to idle slowly to reset the IAC valve (at the 20 count
position).
- Using the timing marks on the pulley, note the
base ignition timing with the strobe light. Specification
= 16 degrees BTDC (Before Top Dead
Center). You will need to stick your head into
the wheel well to get a good view of the timing
marks. Block out any excess light so you can see
the timing marks (use a flashlight if needed). Take your time and be sure you see them well!
- If the timing is not correct (it never is!), one person will
need to watch the timing strobe carefully while
the other slowly adjusts the timing! Do NOT
get your fingers anywhere near the pulleys or the
aux. cooling fans!!
- If necessary, gently slacken the cam angle sensor
housing clamp bolt (it needs a 6mm hex wrench), and then
rotate the housing in
tiny amounts as required to achieve proper
timing. To increase the timing degrees, raise the front of the
CAS a tiny increment by gently tapping it upwards; to decrease the
timing degrees, lower the front of the CAS a tiny increment by
gently tapping it downwards. Tighten the clamp bolt to 24 Nm (17
Ibf.ft) when the timing is perfect.
- When done, take the car out of "Service
Mode" and cycle the engine RPM. Then
return it to "Service Mode"
for a final timing check.
- Clean up your mess!
