Installing Seat Heaters in
your Elan
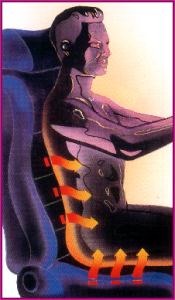 For those
that are interested, I just purchased some seat heaters for my Elan. I was able
to install the heating element for my driver's seat last night. The verdict ...
It
works great! Now I am able to drive with the top down in freezing conditions and
be comfortable. BTW - I also have/use a wind blocker. So for those that are
interested in the seat heaters check out this site ... http://www.Katzkin.com
As for the price, it cost me $106 a seat, which included shipping and handling.
--Jamie
Additional seat heater links:
http://www.aaaconvertible.com/seats.html
http://www.checkcorp.com/
http://www.flash.net/~duetto/seatheaters.htm
http://www.bergwerks.com/seat_heat.jsp
http://shop.store.yahoo.com/gomiata/gomseatheat.html
http://www.nwautoleather.com/nwautoleather/seat-heaters.html
http://store.yahoo.com/4at-last/seatheater.html
http://www.miata.net/garage/duetto_seat.html
http://www.rostra.com/pdf/seatheater-install.pdf
This material contained
on this page is informational in nature only, and does not imply all knowledge
needed to safely work on the electrical system of your Elan! It also does not
include all instructions needed to properly install seat heaters into your
seats. I will not warranty
the contents nor will I take responsibility for your actions if you should
attempt to work on your car based solely on these instructions. See DISCLAIMER.
Failure to follow proper procedures can
lead to vehicle fire and possible personal injury or death!
Jamie gave me the inspiration needed to install seat heater into
my Elan. I know I already live in Southern California, where the weather
is always great, but with the seat heaters I can be assured I can drive with the
top down ANY day or night, except when it rains a few days a year!!
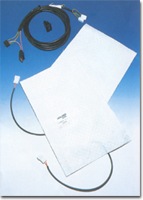 I purchased the seat heater kits from
Katzkin as Jamie mentioned
above. They were $88 each--I picked them up myself so there was no
shipping for me. The kit is actually manufactured by Inalfa
Sunroofs and seems to be very well made. Each kit comes with general
instructions for the heating pad installation. The wiring has a built-in 10Amp
fuse and fuse-holder and there are connectors that snap into each heating
element so the seat is still easily removable. There is a lighted switch which
has 3 positions: 'hi', 'off' and 'low.' The switch is finished in black plastic,
similar to the color of the Elan's mirror control switch.
The supplies needed for this installation are not that many, but
it is an intricate and involved project. It requires a good time
commitment and lots of swearing! The hard part is disassembling the seats to put
in the heating element pads--the easy part is the wiring for the heaters! Plan
to spend a full workday or 2 half days to get the whole project done!
With regard to wiring in the units, you only need an
ignition-switched 'hot' and a 'ground.' It is certainly possible to
"splice" the hot wire into another switched component on the car, but
these heaters will draw a good current when in use. Thus, if you do this you
will have to change the fuse of what you splice it into or you will likely end
up blowing the fuse of the other circuit; and also with this set-up it would be
possible for the other system to get damaged from using the higher fuse.
We are VERY lucky in this regard, however! I
scrutinized the Elan electrical system manual and discovered gold! Lotus has
placed wiring into all Elans for the factory security system, which no US Elans
have installed. The electrical manual describes this system in detail as there
are instructions for its post-production installation. Thus, there is an empty
relay and fuse spot which can be easily accessed; and it just so happens it is
even located in the speaker enclosure behind the left seat !! Even better,
there is a wiring harness that comes alive with the placement of the relay and
fuse with 4 connector wires that you can use for this project as I did.
[As an aside, these 4 wires would be perfect for use in
the installation of about anything electrical. They consist of: a
permanent 'hot', an ignition-switched 'hot', a 'ground', and a 'hot' lead from
the headlamp/gauge lighting switch! ]
Pad Installation into
Seats:
Remove Seats: [Whew, these seats weigh
a whopping 38 pounds each!]
Disassemble seats: [HINT: seats
are modular and not sided--this means you can change the seats so the left
becomes the right and vice-versa if you wish, if the driver's is significantly
more worn !!]
-
Remove bottom runners with 12mm and 13mm sockets--one bolt
of each per side.
-
Remove black circular plastic adjustor wheel. There is
a center plastic piece that is just held in by friction. To remove it
just carefully pry it out. Underneath there is a 10mm bolt which retains the
angle adjuster outer wheel to the seat. Be sure to get the little metal
washer under it too!
-
Now you must remove the side plastic triangular piece.
It is held in place by 2 small plastic push-pin-fasteners. To remove
these you must carefully pry the center pin up and out of the fastener from underneath
(use long thin flat screwdriver)--be careful pulling this center pin out as
the plastic is soft! With the center pin removed you can then gently pry the
rest of the fastener out. Now remove the plastic trim piece to reveal the 2 side screws
beneath it.
-
Now you may separate the seat back from the seat bottom by removing two
13mm
bolts on each side
Seat Back Pad Installation: [Do this
before the bottom to get a sense of progress going as the bottom is much
harder!]
-
Simply remove the ' tongue' from the ' groove' along the length of the bottom of
the seatback to open up the cover.
-
Fell up the seat back with your hand to feel where the
heating pad will go.
-
Cut a bit of the end off the pad to make the right size fit and place
it under the seat cover up the seatback.
I fastened the bottom edge to the seat back cushion with a dab of 3M adhesive
spray and that's all.
-
Now close up the tongue and groove, with the connector coming
out the proper side and you are done with the seat back
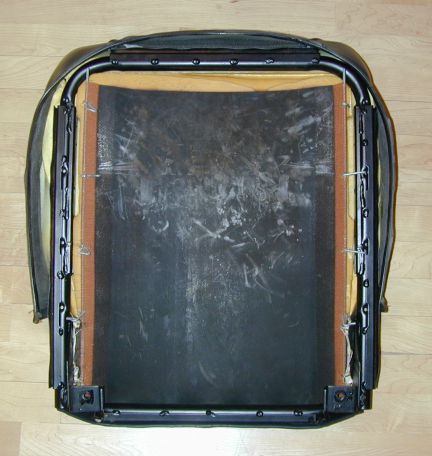 Seat
Bottom Pad Installation:
1. Remove seat cover and cushion together from the
underframe.
-
Use a flat screwdriver to pop open all the metal
retaining clips on the bottom of seat bottom (there is one hiding in the
back corner of each side too).
-
Pry open the small metal retaining O-clips from the rear sides
of the bottom of the cover (save in place for later replacement).
-
Carefully pry the retaining metal sleeve slightly away from
the edges of the seat cover all the way around the seat with a flat screwdriver.
-
Now you may remove the 'tongue' from the 'groove' all the way around
the 4 sides of the bottom of the seat.
-
Carefully lift the seat cushion and cover upward from seat bottom
frame and leave the frame and bottom flap behind.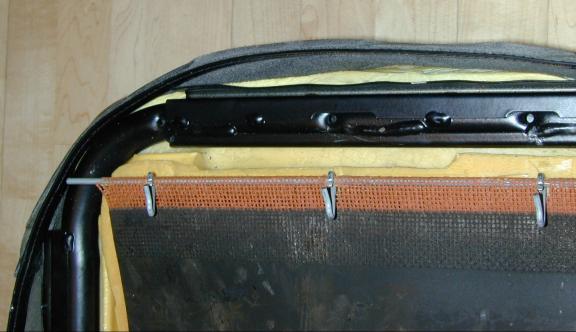
2. Remove seat cover from cushion.
-
Carefully invert the leather seat cover upward and away from
the cushion. Yes, it is still attached to the cushion!!
-
There are retaining wires which connect the cover to the
cushion running WITHIN the cushion in roughly a checker-board
(H-shaped) pattern. This is a tricky part--you must find the deeper
of the wires (times 4) and cut the ends of them (buried slightly within the
cushion) with wire cutters to remove by sliding out these deeper wires.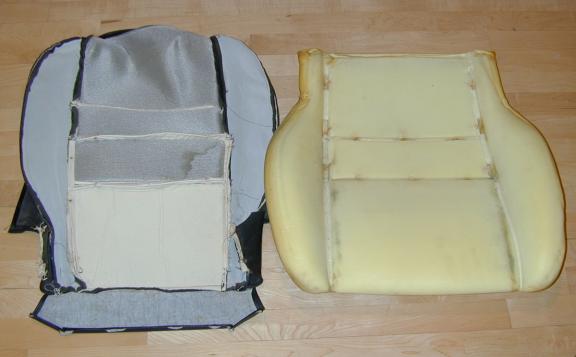
-
Once all 4 deep wires are removed the seat cover will come
free of the cushion.
-
Now remove all the little metal loop retainers from under seat cover
as you will be reinstalling the seat cover without these!
3. Place heating pad and re-attach seat cover.
-
Place heating pad on cushion to determine where to place
reinforcing black strips. See kit instructions. You will place the black strips
on the pad where it will contact the cushion grooves.
-
Cut small holes in the black area per kit instructions for passage of
your new retaining nylon zip-ties.
-
Put a plastic dowel in place of the wire elements in the 2 cross
brace areas. You can leave the 2 side wires as-is.
-
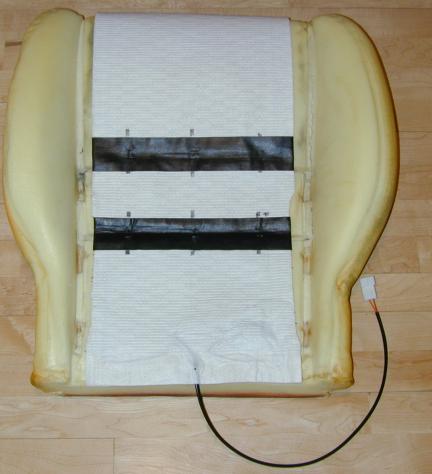 To
slowly re-connect the cover to the cushion, run the large zip ties up from
the bottom of the cushion, thru the cushion, thru the pad (in the reinforced
area), over the plastic dowel, then back down thru the reinforced pad area, and
back down thru the seat cushion to make a loop!
-
You will do this 3 times on each horizontal strip.
-
Place a new holder strip, supplied with the kit, on the
bottom of the seat cushion so that the 3 zip ties will go thru it. Do this
once for each row and then loosely connect the zip ties--you will not
tighten them fully until the sides are reattached and you are sure
everything is right!
-
Place large zip ties on the sides in the same fashion. I
chose to do this as it was easier than reconnecting the little metal loops.
The kit only supplies 6 zip ties per seat so I bought more--very cheap! You may keep the
top wire here--you will not go thru the heating pad on the 2 sides. I
put 2 of the wires I removed along the bottom to loop the side zip ties
around them for support.
-
Zip all the ties to secure seat cover to cushion. They
do not have to be monster tight, just tight enough to make the seat cover
stay in place and look right to you!
-
Trim the far end of the heating pad to the length of the
front edge of the seat.
Reassemble seats:
This is the reverse of disassembly, you can figure it out! This is
where you could switch the seat sides if you wanted.
After replacing all the tongue-and-groove sides of the seat
cover, use a rubber mallet (or gentle hammer) to close the gaps of the metal retainer lips around
the bottom. Don't forget to re-do the 2 small metal O-clips on the sides of the seat bottom.
Relax, the hard part is over--get yourself a beer and your
sanity back!
Wiring:
Before proceeding with the
in-car wiring, you MUST disconnect the positive lead to car's battery--or risk
an electrical fire
like I encountered!!
Remove Seats and Center Console:
-
You already removed the seats, right?
-
Remove the left and right rear speaker housings by pulling
forward and upward on them. They are only held in place by friction
and by a little plastic socket on the inner side.
-
Remove center console:
Carefully pry up the edges of the mirror switch and
the 2 window switches and lift them out of their spots.
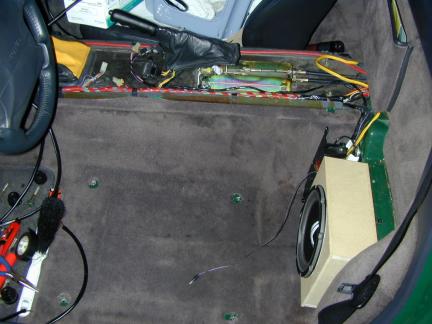 Disconnect them from their wire
harnesses.
Open lid to storage area in center console and remove the 2 screws on the
bottom.
Lift out
this tray and then remove the 2 larger screws beneath this tray.
Remove the 2 large screws beneath where the window switches
sit.
Gently lift the console up and forward to remove it.
You will need to have the parking brake max up and the shifter forward to
help it clear on the way out. Be careful not to scratch anything as it
is a tight fit.
Locate In-car Wiring and Wire-in Heaters: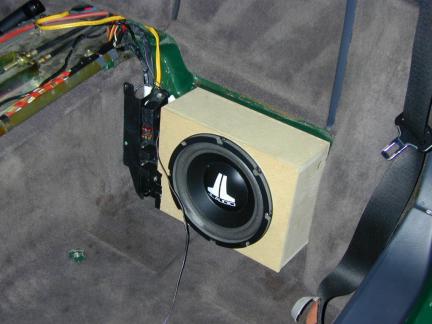
The relay strip is located behind the left rear speaker housing
(see picture at right). Mine looks different because it was moved a bit
for placement of my subwoofer. You will see there are 2 relays in place on
the left of the unit with an empty socket between them--this is the "phone
relay" spot we will be using (see picture at left).
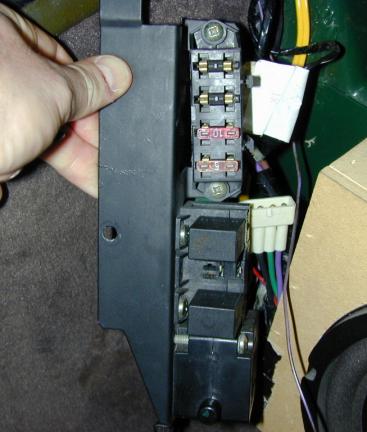 The
relay you need for this is a Bosch Mini-relay (Lotus part # A100M6015F)
which is identical to the one on the left end, which is the
fuel-pump relay. For the final wiring you must obtain another identical
relay and
place it into the unused receptacle. However, you can simply
"borrow" and use the fuel-pump relay while you install the heaters;
but you will obviously not be able to drive the car until you replace the
fuel-pump relay [BTW, this is the perfect anti-theft trick if you are leaving your car for
more than a day or so!].
[FYI, I did check all my
local auto parts stores, electronics stores, GM dealers, and a few other auto
dealerships with NO success in finding the relay in
question! I finally got one from R.D. Enterprises (see links)
for $24 plus shipping--though they are cheaper from Dave Bean at $8.25 (see links). I still think this wiring is better than using an
add-on relay (for only a few bucks) as the end result is nearly
"factory."]
Now that the relay is in place, this completes the electrical
connections to the white plastic connector at the middle of the strip. The
four wires at this connector consist of: a
permanent 'hot' (purple wire); an ignition-switched 'hot' (green wire), a
'ground' (black wire), and a 'hot' lead from
the headlamp switch (orange wire). You will need to place a fuse into the
fourth (or end) fuse slot to activate/fuse the green wire for your
wiring!! I chose to place a 15Amp fuse here--I would rather have this fuse blow,
which is readily accessible, than have one of the fuses blow on the individual
heater wires, which end up buried within the center console upon reassembly!!
Leave the third fuse spot blank as it is for the purple wire which we are not
using. (FYI: I have not had any problems to date using the 15A fuse with
both seat heater on 'hi' together)
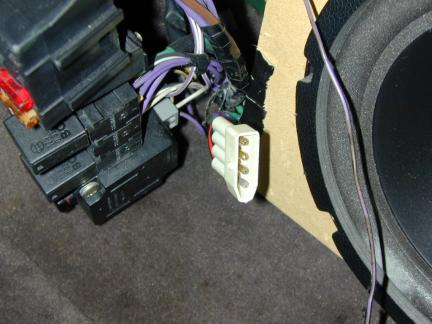 Locate
the WHITE plastic harness connector under the relay strip and remove the outer
"dummy" cover from it (it took me a while to realize this is a blank
connector attached to it so I wanted to point out its true name). this
reveals the 4 'male' ends of the aforementioned wires.
 Now
you must simply twist the two red 'hot' wires from the heaters together and the
two brown 'ground' wires together. I used "14-16AWG female bullet connector ends"
(local hardware store) to plug the reds into the green and the browns into the black wire.
I used this size as I could get the two red and brown wires twisted together
into the end of this--the female end was a bit too large so I closed the size
down with a pliers. I used empty "18-22AWG female bullet connector ends" to plug the
other 2 male ends--these actually fit the white connector better, but I could
not get the twisted wires from the heater side into the small end of this size
connector for crimping, so I chose the other as stated above.
That's it as far as wiring it to the car--I told you this was
the easy part!! I did shorten (cut) the leads (red and brown wires) a bit
from the harnesses as they were too long. You can now trial the
system: plug it all together, replace the battery lead, and be sure it
works properly!
Run Wires within Car:
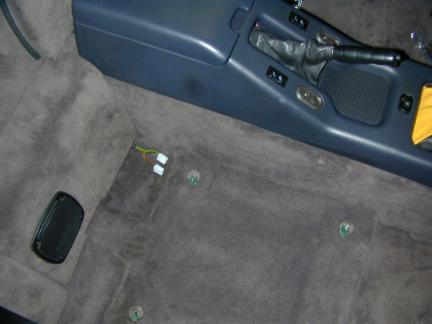 Now
you must run the wires from the wiring connector to the switch, wherever
you put it. If you put the switches in the center console like I did, you can
cut out a place for them with a new, sharp utility knife (did you just hear your
mom's voice say, "don't cut yourself with that knife"?). If you do
this be sure to error on the small side for the switch hole and then enlarge it slowly as needed.
If the sides are too narrow it will "pinch" the switch and make it
hard to toggle.
Also when the switch holes are finalized, turn the console over and place
spots of epoxy at all the corners of the cut console--this is how you keep it from cracking in the
future due to the weakened area you created by cutting it !!
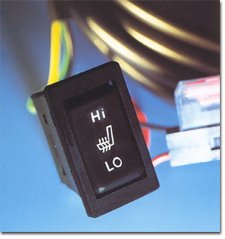 From
the switches the wiring runs back to the respective speaker cover area to plug
into your seats at the connector plugs. [HINT: use small nylon zip ties to hold the wires where you want]
Now re-install the center console. I recommend putting a piece
of tape on all the switch plugs so you can pull them up through their holes
while you are replacing the center console down!! Be sure not to pinch any
important wires and that it sits flat down.
Re-install the seats, plug the connectors together, and hide
them under the speaker area covers while you replace them.
Now you are done!! Congratulate yourself by
snuggling up with a cold beer or two in your new hot seats! But please
don't drink and drive. ;-)
I hope you enjoyed this write-up! Please let me know if it
was helpful to you.
Happy
Elaning, Doug