Bleeding Your Elan's
Brakes
This procedure runs through bleeding the brakes on your Elan.
This material contained
on this page is informational in nature only, and does not imply all knowledge
needed to safely work on the braking system of your Elan! I will not warranty
the contents nor will I take responsibility for your actions if you should
attempt to work on your Elan's brakes based solely on these instructions. See DISCLAIMER.
Brake pads may contain Asbestos
dust which can cause cancer, and proper mask/ventilation should be followed.
Brake fluid is caustic and should be handled and disposed of properly.
When to Bleed your Brakes
Because DOT 3 & DOT 4 fluid is glycol based, it absorbs moisture over time.
Moisture seeps in through microscopic pores in the rubbers seals and hoses. It
enters every time someone opens the master cylinder reservoir to check the fluid
level. Most fluid reservoirs are transparent so the level can be checked without
having to open the lid. Brake fluid is so hygroscopic (attracts water) that
leaving the lid off fresh brake fluid can ruin it overnight--it will absorb so
much water from the air it will be too contaminated to use.
Moisture contaminates the fluid causing a drop in its boiling point which
leads to fluid boil and brake fade during hard use. Moisture causes
internal corrosion in the calipers, wheel cylinders, and steel lines. The reason
for replacing the fluid periodically is to get rid of the contaminated fluid and
to restore the heat and corrosion resistance of the fluid.
When a car's brake fluid is one year old, it contains 2.5% water. At 18
months, the water moves up to 3% which is enough to lower the boiling point of the
fluid by 25%. After a few years, fluid can have 7% to 8% water. Many
experts recommend changing brake fluid at two years or 24,000 miles. At the very
least flush the brake fluid completely at every brake job.
You SHOULD bleed your system and change your fluid at
least once a year to get the moisture laden old fluid out. Your brake system
will last much longer this way as the moisture in old fluid causes corrosion of
the brake systems internal parts. If you are racing or using the car for hard
driving and braking, the fluid changes should be
much more frequent than that.
Fluid Fade
Fluid fade usually has a gradual onset--the phenomena is started by the boiling of the brake fluid in the calipers. This
produces bubbles in the brake system. Since bubbles are compressible, this makes
for a soft, spongy pedal. In worse cases, the pedal can plunge to the floor with
very little slowing! Fluid fade can be avoided by running a high grade racing-type brake fluid and/or frequent changes of brake fluid. Also if you change the
pads before they get super thin, the thicker pad friction material will help
insulate the calipers from the heat.
Bleed versus Flush
There are really two different things to do with brake fluid: bleed and flush.
Bleed is where you replace a little of the fluid. This may be done after a brake
pad change or after boiling the fluid in the calipers.
Flushing the system is where you replace all the fluid in the system. This would
be done on a yearly or bi-yearly basis or after major brake system work.
Both bleeding and flushing the system are often referred to as
"bleeding" because the valve on the caliper is called a "bleed valve."
What will be called "bleeding" in this write-up is technically a
"flushing"!!
Brake Fluid
See HERE
for a discussion of the different types of Brake Fluid!
Some High-Quality Brake
Fluids:
Super Blue and
Typ200 Racing Brake Fluid
The Super Blue and Typ200 racing fluid were both developed for motorsport and
are used by many racing teams world wide. Its extremely high boiling point makes
either racing fluids the ideal product for road racing, auto cross or high
performance driving schools. Both Super Blue and Typ200 have a boiling point of
536 deg. F, with a wet boiling point of 392 deg. F. With rotor surface
temperatures reaching as high as 800 deg. F., it is important to select a brake
fluid that will resist thermal break down. Brake failure occurs once the fluid
reaches the boiling point, forming air bubbles in the brake system. Super Blue
and Typ200 both exceed all DOT 4 requirements and frequently satisfies
individual specifications of the DOT 5 standards. Both products are identical in
performance, however the unique blue color of the Super Blue will help avoid
mixing with other inferior products.
AP Super 600
Motul 600
You should expect to use at LEAST a whole quart of brake fluid during the
flush!
Parts Needed
- Brake fluid (see discussion above)
- Brake cleaner spray
Tools Needed
- Protective gloves
- Jack and jack stands
- Wheel lug wrench
- Torque wrench (recommended and worth buying!)
- Bleed Screw wrenches (9mm AND 10mm)
- "turkey baster" (read on!)
- clear vinyl hose, about 30 cm. (auto or hardware store)
- catch bottle (empty, screw-top soda bottle)
(you can get a "bleed kit" with the tubing and catch bottle
at the auto store)
- flashlight or work light
- small rubber mallet
Before you start: Brake fluid is hydroscopic which means it has an affinity
to water and absorbs water from the air. When brake fluid absorbs water it’s
boiling point drops rapidly. That why it is important to use only very fresh
brake fluid, preferably from a recently opened bottle where the factory seal has
just been broken. When bleeding brakes, keep the bottle capped except when you
are pouring the fluid out. It is also a good practice to keep the cap of the
master cylinder reservoir on, but only loosely screwed about ½ turn while you
are bleeding, as the brake fluid pulls in the humidity from the air and thus you
want to minimize its direct exposure to the air.
Only use brake
fluid that hasn't been previously opened.
Bleed Methods
There are several methods of brake bleeding recognized by professional technicians:
- Gravity Bleeding
- Stroke Bleeding
- Pressure Bleeding
- Vacuum Bleeding
Any of these four methods of bleeding can work fine.
- GRAVITY BLEEDING
Remove the master cylinder cover and open one or more of the bleeder
screws to allow the brake fluid to flow out of the system by its own weight.
As the brake fluid drains out of the system it will also purge the air along
with it. When there are no more air bubbles in the escaping brake
fluid and the fluid is clean, then the bleeder screws are closed.
It is important that the master cylinder reservoirs be kept full of fluid
to prevent more air from being drawn into the system as it is being bled.
The method is slow an not precise and will likely not remove all
the air or old fluid from the system!
- STROKE BLEEDING
Have one person in the vehicle gently apply the brake pedal. Have
another person under the vehicle open and close the bleeder screws in the
proper sequence. Continue this process until all of the air has been
purged. It is not recommended to "pump the pedal," as aeration of
the fluid can easily occur. If this method is used, the pedal should
be depressed and released slowly. (Note: See discussion below)
The method is discussed below. It is historically the most common and the
one preferred by many, but its popularity has declined with the availability
of the pressure and vacuum methods listed below!
- PRESSURE BLEEDING
This is accomplished by utilizing a container with a diaphragm separating
brake fluid from pressurized air. This pressure is used to force brake
fluid through the system. The air is purged as the brake fluid flows
out of the bleeder screws. Open each bleeder screw in the proper
sequence until there is no air present in the fluid. With the correct
adaptors and the proper bleeding sequence, this is usually the fastest
method of bleeding a brake system.
- VACUUM BLEEDING
A vacuum is used to pull fluid through the system with any trapped air along
with it. Be sure to keep the master cylinder
reservoir full as it is being bled. The bleeder
screws are opened in sequence, while a vacuum draws out the old fluid
and air. The hose to the bleeder screw is clear plastic in order to see when
the air is completely purged.
CAUTION
Care must be taken when stroke bleeding the system. The master
cylinder seals can be damaged by forcing the seals internally over an area that has
excessive rust and corrosion build up. This build up is from moisture
and other foreign matter which may be present in the brake system. In
the portion of the bore where the seal normally operates, it will stay clear
of build up. Where the seal has not traveled, this foreign matter can
cut or tear the seals if they are extended into this area during the
bleeding process.
To assure this type of damage does not occur, do not depress the pedal more
than 3/4 of full pedal travel. One method of assuring the pedal is not
over stroked is to have the person in the vehicle place his/her left foot under
the pedal while depressing the brake pedal with the right. However it is accomplished, the master cylinder must not be
over stroked, or damage to the seal(s) may result. It is also necessary
for the person in the vehicle pressing the brake pedal to hold the
pedal in the down position until the bleeder screw is closed to prevent air
being drawn back into the system when the brake pedal is released.
Remember, do not rapidly pump the brake pedal.
Bleed one wheel's caliper at a time, doing them in order of decreasing brake
line length. This means:
-
rear right,
-
rear left,
-
front right,
-
front left.
Bleed Procedure: (Stroke Method)
This method is traditionally a two-person job.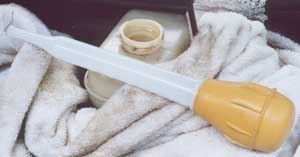
- Open the hood. Clean around the cap of the brake fluid reservoir, but do
not use water now (remember water is your enemy here!). Remove
the cap, then remove, by sucking out (you should buy a $3 turkey
baster) all the fluid in the reservoir until you can see the intake opening
at the bottom of the reservoir--use flashlight if needed. Leave just enough fluid to cover the
holes. Then slowly, as not to mix the fluids more than necessary, fill the
reservoir with new fluid to the very top.
- Go to the first wheel caliper you plan to bleed. Take tools, paper towels,
brake cleaner spray, and the work light.
- Loosen the wheel lug nuts just a bit!
- Jack this corner of the car up enough to remove the wheel. Be
careful not to scrape the front of the wheel as you set it aside.
- Ah-ha, there's that famous Lotus suspension again. Now is your time to inspect
the current condition of your suspension parts, bushings, brake lines,
calipers, rotors, brake pads, etc. Be sure you do not need to replace
the brake pads before this brake bleed! (see front
brake info)
- Remove the plastic dust cap from the bleed valve on the caliper (do not
lose it)
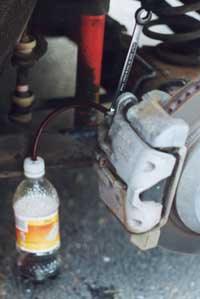 .
- Place the correct wrench over the valve--the rear screw is 10mm
and the front screw is 9mm. Then push the vinyl hose over the
valve, capturing the wrench. Put the other end of the hose into your catch
bottle. You may want to make a circle/loop with the tubing so air
cannot rise within it!
- Gently tap the caliper with the rubber mallet to help the air bubbles rise
to the bleed nipple--repeat as needed.
- Get your accomplice (#2) into the driver's seat, with his/her foot on the
brake. #2's job is going to be pumping the pedal, to force fresh fluid from
the reservoir out to and out of the caliper.
- Be sure to add the NEW brake fluid to fill the reservoir full prior to beginning
the bleed at each corner!!
- Have your friend apply pressure to the pedal. You (#1) crack the valve on
the caliper, about 1/4 to 1/2 turn, and let fluid drain into the catch bottle. When #2's
foot has pushed the pedal partway down, s/he signal's #1, who then closes
the valve lightly.
- Do NOT push the pedal to the floor--this can cause damage to the seals of
the master cylinder. You should only push the pedal as far as the normal
travel. You can place a piece of wood, your other foot, or other hard item behind the
brake pedal to assure you do not depress it too far.
- Important!! #2 should NOT release the brake pedal until #1 has closed the valve.
Otherwise, the rising pedal will suck air back into the caliper (BAD!!).
- The two of you need to establish a coordinated rhythm. Something like:
| #1 (in driver's seat) |
#2 (at caliper) |
| applies pedal pressure, |
|
| says: "Pressure!" |
|
| |
opens valve, |
| |
says: "Open!" |
| pushes pedal down, |
|
| then says: "Down!" |
|
| |
closes valve, |
| |
then says "Closed!" |
| releases pedal, |
|
| says: "Releasing...Up!" |
|
You need to repeat this cycle a number of times. Look through the vinyl hose, watching the quality of
the fluid coming out the valve.
- If you're flushing the fluid, the number of pumps needed depends on the
line length. Look for fresh, clean fluid coming down the hose. If you're replacing standard brake fluid with ATE Super Blue, it'll change
colors--> a-ha, the reason to get it! From golden (or brown), it'll turn green, and eventually blue. Keep
bleeding until it's a nice Smurf blue.
- In all cases, watch your fluid level in the reservoir. Do NOT let it fall
more than half-way down! If the reservoir runs dry, you will suck air into
the lines and have to start all over. Watching the reservoir and keeping it
filled is a possible job for a third person.
- When you're done with a valve, close it snuggly, remove the hose and
wrench, and replace the dust cap. Wipe up any fluid which has dripped and
clean the area with the brake cleaner spray. Brake fluid will remove
paint if left alone, so be sure to clean properly!! Replace the wheel and move the jack to the next corner.
- And when you're done all 'round, check the pedal feel. If you have any
doubt about the work you've done, don't drive the car. Get help!
- Top off the brake fluid reservoir to the "Max" mark, replace the
cap, and wipe up any spilled fluid.
Bleeding using a Hand Vacuum Pump: (Vacuum
Method)
You may want to invest in a simple vacuum pump to bleed the brakes. One such
tool, (supposedly??) available for about $20 at Walmart is the "Mityvac Vacuum Pump /
Brake Bleeding Kit." The pump is applied to a bleed nipple, and pulls fluid
through the system. This technique has the advantage that it is a one-person
job! I have not seen this product or heard from anyone that has actually used it
so can give no feedback about it.
Griot's
Garage sells (among other neat things) a neat little vacuum extractor for
$65. This is what I use! It has a brake bleed valve end-attachment.
ITEM#10122, phone 800-345-5789.
Similar method here except you can do it by yourself and save
all that pizza and beer money and payback-favor-time needed for your helpers!
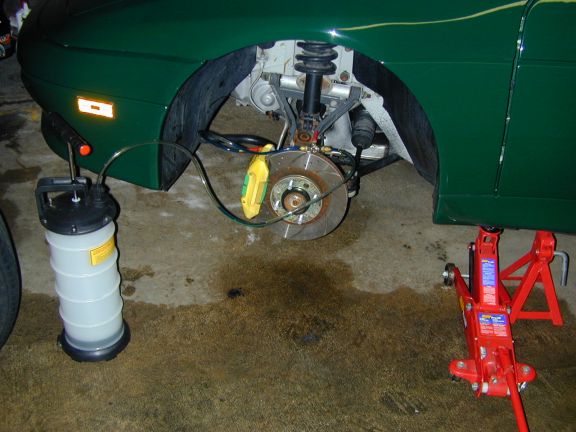 In brief: connect hose to bleed valve, build small
pressure in line (one pump of handle), crack valve open, observe slow fluid flow out, be patient,
wait more, hang in there, observe the fluid change colors, close the bleed
valve, remove the hose, clean up, and get on to the next caliper!!
Important: Do not build a
high pressure using a vacuum method. This can cause cavitations within the
fluid and/or can cause air to be drawn in thru the bleed screw threads!
HINT: I found it best to fully remove the bleed screw,
put a single turn of white thread-seal tape around the screw threads, and then
re-install. This assures an air-tight seal for use with the vacuum method.
When done, be sure to pump the brake pedal a few times to restore a firm
"feel." Do not be one of the many who
forget this, only to
remember when the pedal goes to the floor when backing the car up!!!
DIAGNOSING BLEEDING PROBLEMS
- No air or fluid will come out the opened bleeder screw
A. Bleeder screw plugged
B. Brake line, hose or valve damage
C. Air leaking in through bleed screw
D. Master cylinder outlet plugged
-
Low or spongy pedal after bleeding
A. Air in the system
B. Mechanically related
Speedbleeders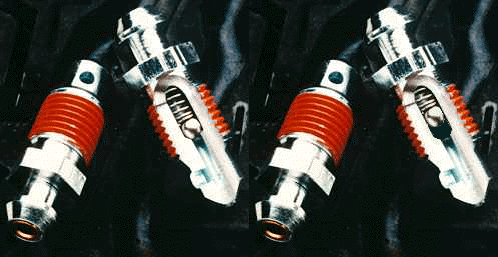
I am working on finding the proper Speedbleeders for the Elan!
Check out their web
site at http://www.speedbleeder.com/
These are pretty cool and are getting rave reviews from all the magazines and
auto web sites. They eliminate time consuming and messy brake bleeding and make
it a one-person job! Simply install, loosen 1/2 turn, slowly step on the brakes about
4-5 times, tighten and you're done! This valve bleeds the brakes without allowing air
back into the system using a spring check valve! Simple and Ingenious! COST and
TIME EFFECTIVE!
Cost should be about $6.50 each.
Brake fluid is toxic. Dispose of it
using your town's hazardous waste program.
Notes / Hints:
1. Brake fluid is an excellent paint remover!
2. NEVER shake a
container of brake fluid.
Soft brakes even after bleeding: You probably still have air in the
system somewhere. If you have had parts of the brake system disconnected, ensure
that the bleed nipples for the wheel cylinders and front calipers are at the top,
so that the air can all escape during the bleeding process. (The air bubbles
rise to the top.)
Tech tip: When preparing your car for a driving school or autocross, focus
should be centered around the brake system. The most common failure at these
events is overheated brakes, rotor warpage, and brake fluid failure. Start with
fresh brake fluid. Select a high-performance brake fluid with a boiling point
well over 500 degrees. Old contaminated brake fluid, or fluid that has heat-cycled
several times should be flushed. Select a brake pad designed for racing. Street
pads are designed for street use. The bonding agent used to glue the brake
compound will vaporize under extreme heat. This vaporized gas forms a cushion
between the disc and pad, reducing the brake effectiveness. Caution: racing pads
will dust, and do make noise. You can learn to switch pads in less than a hour.
Save your race pads for the track.
A good trick is to flush it with a fluid of a different color to tell when
you're completely flushed. Super Blue (which is ...blue) has a sister fluid
which is gold... same everything except color.
Hint from Mark Hooper: With
regards to the procedure used when bleeding the brakes of an Elan, I found that
the following helps:
Remove the front pads and then compress the piston fully into the caliper
housing (before you start bleeding the brakes).
Hold it there using some form of clamp (I used a G-Clamp). Now proceed with the
brake bleeding operation as described.
When I did this, even though I'd only recently bleed the entire system, the
colour of the fluid that was expelled initially was quite amazing.
--Mark
Have fun saving money and learning about your Elan.
Let me know if I should add anything else.
Happy
Elaning, Doug